Long-winded explanations and pontificating intros on blogs annoy me. If you’re here, I’m going to assume you know what DoH is. If not, see some intro material from Cloudflare.
So, what’s the easiest and most reliable way to get this set up for your home or small office network? In my opinion – Debian. There are some caveats, mainly that systemd requires some custom socket configs to allow this to work properly, but the tradeoff is a rock-solid system that just works and does what it’s supposed to do.
Let’s get into it.
Step 1: Install Debian
Download the latest stable image of Debian, and transfer the ISO to the bootable media of your choice. Rufus is always reliable for creating a bootable USB stick.
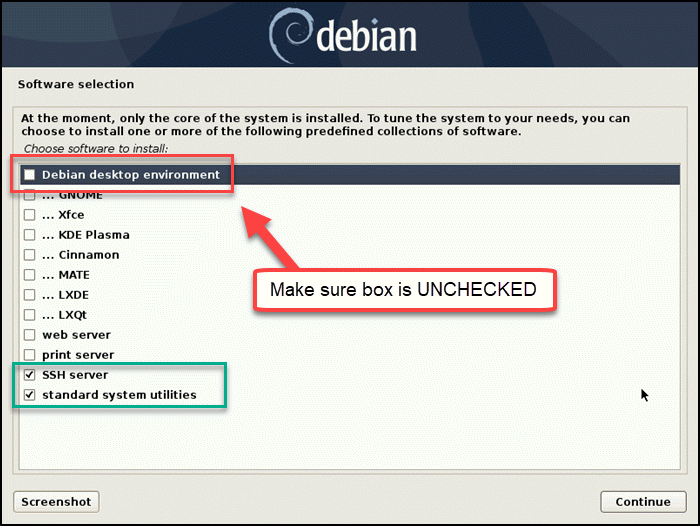
Install, and make sure to de-select all installation packages except “SSH Server” and “standard system utilities”
Special Note: If you install the GUI, you’ll get NetworkManager and all the garbage that comes along with it, and the instructions in this guide may or may not work.

Step 2: Set Static IP Address
Static IP Setup
Install net-tools so you can use ifconfig to check interface name
sudo apt-get install net-toolsCheck interface name using the command “ifconfig” – most likely it will be ens192 (no screenshot)
Modify the /etc/network/interfaces file, and set the ens192 interface static IP, netmask, and gateway. Make sure no DNS info exists or gets entered into this file. More details on setting static IP addresses can be found here.
# example interfaces file

# The loopback network interface

auto lo
iface lo inet loopback

# The primary network interface

allow-hotplug ens192
iface ens192 inet static
      address 10.1.1.125
      netmask 255.0.0.0
      gateway 10.1.1.1
Step 3: Install dnscrypt-proxy
Purge any pre-existing dnscrypt-proxy installations or configs.
sudo apt purge dnscrypt-proxyInstall dnscrypt-proxy
sudo apt install dnscrypt-proxyModify the /etc/dnscrypt-proxy/dnscrypt-proxy.toml file to use Cloudflare as DoH provider.
# change server_names line to the below

server_names = ['cloudflare', 'cloudflare-ipv6']
Step 4: Modify/Add systemd Files to Allow Listening for Remote Client Requests
The Problem
This was the part that drove me nuts. You’d think you could simply modify the /etc/dnscrypt-proxy/dnscrypt-proxy.toml file to add the listening IP there (in many distributions, that works fine). However, and I do think this is better for overall system security and stability, systemd requires the listening setup done via the systemd config files.
If you try to set a listening IP address in the /etc/dnscrypt-proxy/dnscrypt-proxy.toml file, the dnscrypt-proxy service will fail, and upon issuing the “systemctl status dnscrypt-proxy.service” command to query service status, you’ll find that you are getting a “bind: permission denied” error on the socket creation request.
# output omitted

Active: failed (Result: exit-code) since Sat 2019-11-23 22:28:58 CET; 999ms ago

# output omitted

Nov 23 22:28:58 vps.domain.com dnscrypt-proxy[4613]: [2019-11-23 22:28:58] [FATAL] listen udp 10.7.0.1:53: bind: permission denied
I give the above example simply for reference, and as a breadcrumb for some lost soul such as myself – who was Googling, trying to get this to work (lol).
The Solution
The solution is rather simple…if you know your way around systemd sockets. I didn’t, but I do now. That’s why we do this stuff right? To learn.
In any case…
Copy the existing default socket file to create a separate ipv6 socket file. I found having separate sockets for ipv4 and ipv6 was a cleaner way to do it.
sudo cp /lib/systemd/system/dnscrypt-proxy.socket /lib/systemd/system/dnscrypt-proxy-ipv6.socketEdit the existing default service file to reference the newly created ipv6 socket so you can handle both ipv4 and ipv6 requests.
sudo nano /lib/systemd/system/dnscrypt-proxy.service

# add the below line

Requires=dnscrypt-proxy-ipv6.socket
Edit the existing default socket file to setup the socket to listen on all available ipv4 addresses.
sudo nano /lib/systemd/system/dnscrypt-proxy.socket

# set up the socket as follows

[Socket]
Service=dnscrypt-proxy.service
ListenDatagram=0.0.0.0:53
NoDelay=true
DeferAcceptSec=1
Edit the newly created ipv6 socket file to setup the socket to listen on all available ipv6 addresses.
sudo nano /lib/systemd/system/dnscrypt-proxy-ipv6.socket

# set up the socket as follows

[Socket]
Service=dnscrypt-proxy.service
ListenDatagram=[::]:53
BindIPv6Only=ipv6-only
NoDelay=true
DeferAcceptSec=1
Step 5: DNS Name Server Setup
We now need to make sure the server never requests DNS from anything other than itself, and the resulting dnscrypt-proxy service running on it.
Modify the /etc/resolv.conf file, and make sure it has no other info than the below.
# example resolv.conf file

nameserver 127.0.0.1
After saving the file, change it to immutable so other system services (like NetworkManager) and/or other users can’t change the contents.
sudo chattr +i /etc/resolv.confStep 6: Verification
After all the changes are complete, reboot the server. This does two things. First, it ensures that all services come back up statefully after all the changes we’ve made. Second, it ensures our configuration will survive successive reboots.
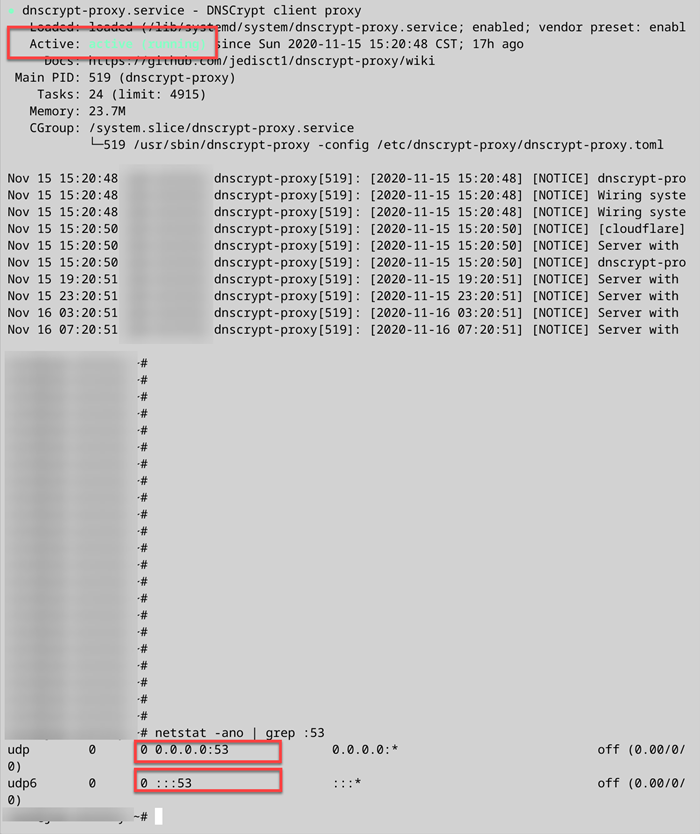
Once the server is back up, check first that the dnscrypt-proxy service and sockets are running.
sudo systemctl status dnscrypt-proxy.service
# verify active and running

sudo systemctl status dnscrypt-proxy.socket
# verify active and running

sudo systemctl status dnscrypt-proxy-ipv6.socket
#verify active and running
Then, check the sockets are open and listening for remote requests.
sudo netstat -ano | grep :53Check that both the ipv4 and ipv6 sockets are listening.

Run a test from the command line to check dnscrypt operation.
dnscrypt-proxy -resolve cloudflare-dns.com

# You should get something resembling the below output

Resolving [cloudflare-dns.com]

Domain exists: yes, 3 name servers found
Canonical name: cloudflare-dns.com.
IP addresses: 2400:cb00:2048:1::6810:6f19,
2400:cb00:2048:1::6810:7019, 104.16.111.25, 104.16.112.25
TXT records: -
Resolver IP: 172.68.140.217
Step 7: Test With a Client Workstation or Laptop
Now, set a computer to use the IP address of your Debian server as it’s DNS.
NOTE: It may seem strange, but do not set up a secondary DNS address on your workstation/laptop. If you do, your computer will load balance between the two and not all of your DNS will be encrypted.
Check your DoH settings using Cloudflare’s test page.
You’ll probably get an Encrypted SNI failure, but that’s to be expected. SNI doesn’t always work, or at least doesn’t always register.
Enjoy!


